Professional-looking videos are not created by the camera alone. One of the most important stages of post-production is color grading, which transforms ordinary footage into visually stunning scenes. Whether you are creating YouTube videos, short films, documentaries, commercials, or travel content, learning Color Grading for Beginners can dramatically improve the overall quality of your work.
Fortunately, you don’t need years of experience to start grading videos like a professional. With the right workflow and basic understanding of color theory, anyone can create cinematic visuals.
This guide explains Color Grading for Beginners, covers the essential tools, introduces color correction, and shares practical techniques that help create polished, professional videos.
What Is Color Grading?
Color grading is the creative process of adjusting colors, contrast, brightness, saturation, and overall mood after correcting the original footage.
While color correction focuses on making footage look natural and balanced, color grading adds a creative style that enhances the emotional impact of a scene.
For example, warm orange tones may create a cozy atmosphere, while cool blue tones often communicate mystery or tension.
Why Is Color Grading Important?
Learning Color Grading for Beginners provides several advantages.
Some of the biggest benefits include:
- Creates a cinematic appearance.
- Improves visual consistency.
- Enhances storytelling.
- Corrects exposure issues.
- Produces professional-looking videos.
- Matches multiple camera angles.
- Builds a recognizable visual style.
- Increases production value.
Moreover, proper color grading helps your audience stay focused on the story instead of technical imperfections.
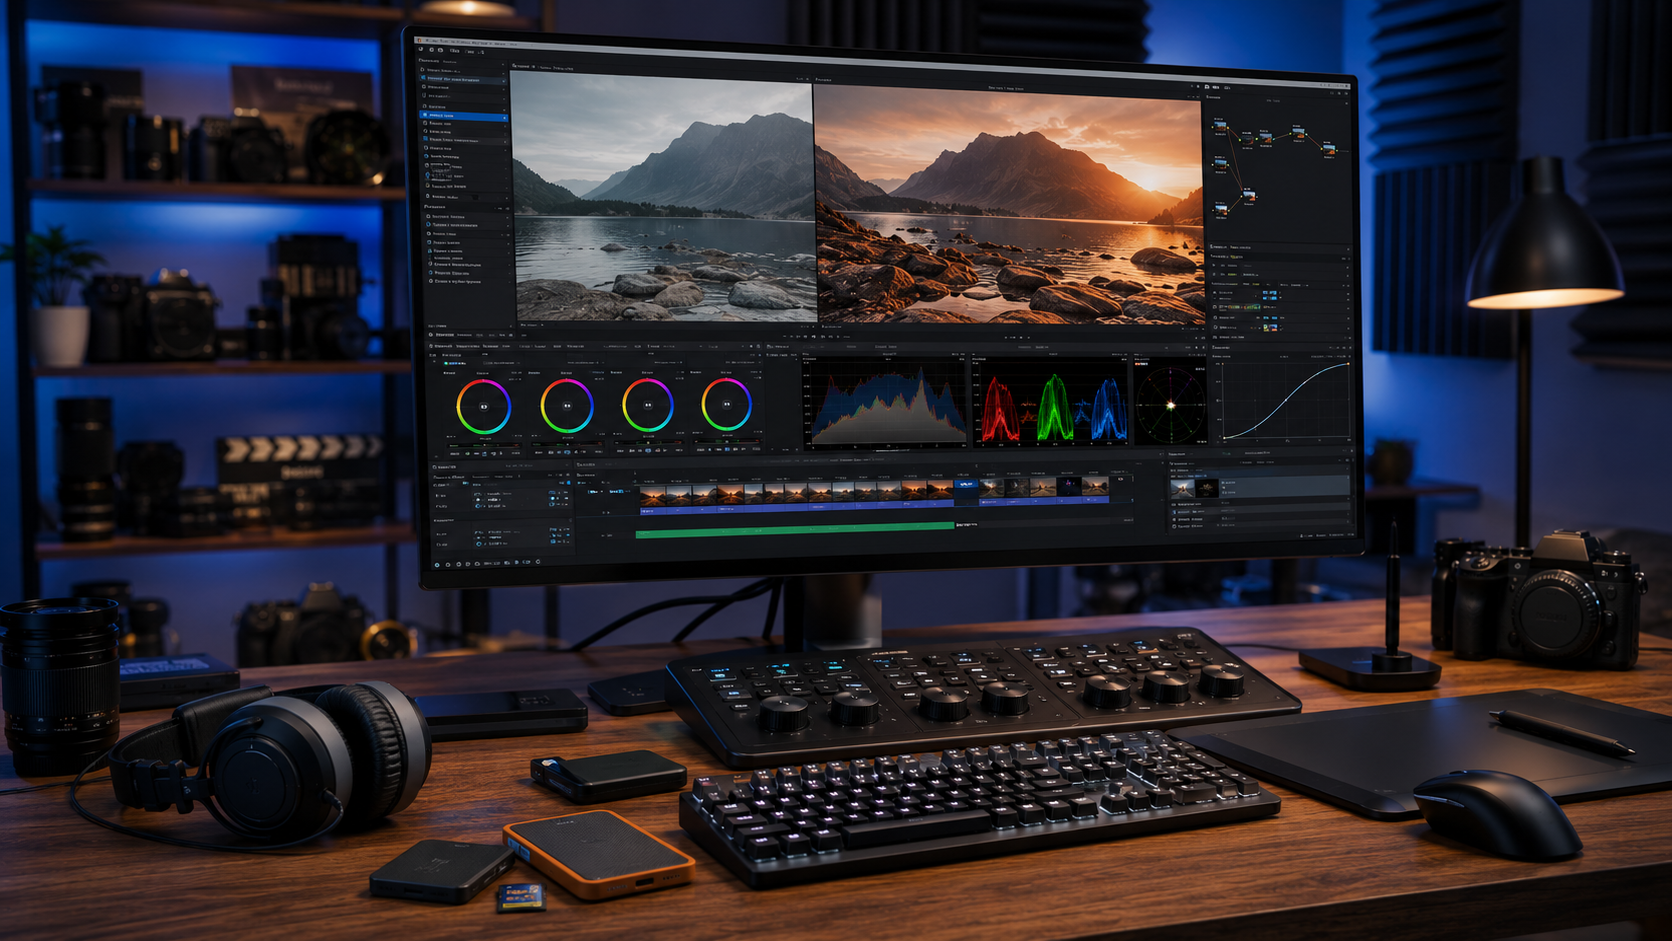
Essential Color Grading Tools
Most professional editing software includes powerful color grading features.
Popular choices include:
- DaVinci Resolve
- Adobe Premiere Pro
- Final Cut Pro
- VEGAS Pro
- CapCut Desktop
These applications allow filmmakers to adjust exposure, contrast, white balance, shadows, highlights, saturation, curves, and color wheels.
Step 1: Start with Color Correction
Before applying creative effects, correct your footage.
Begin by adjusting:
- White balance
- Exposure
- Contrast
- Highlights
- Shadows
- Blacks
- Whites
The goal is to create a clean and balanced image before adding any artistic style.
Step 2: Adjust White Balance
White balance controls the overall color temperature.
If the image looks too blue, increase the warmth.
If it appears too orange, cool the temperature slightly.
Correct white balance creates natural skin tones and realistic colors.
Step 3: Improve Contrast
Contrast adds depth to your footage.
Increase contrast carefully by darkening shadows while preserving highlight details.
Avoid making the image overly harsh because excessive contrast removes important detail.
Step 4: Enhance Saturation
Saturation controls color intensity.
Increasing saturation slightly makes colors appear richer and more vibrant.
However, excessive saturation creates unrealistic colors and unnatural-looking skin tones.
Professional filmmakers usually make subtle adjustments rather than dramatic changes.
Step 5: Use Color Wheels
Color wheels allow you to adjust the colors in different tonal ranges.
Most editing software includes separate wheels for:
- Shadows
- Midtones
- Highlights
For example, you can add slightly cooler blue tones to the shadows while introducing warmer orange tones into the highlights to create a cinematic appearance.
Small adjustments usually produce the most natural results.
Step 6: Apply LUTs Carefully
LUTs (Lookup Tables) are preset color profiles that instantly change the appearance of your footage.
They can save time and provide a professional starting point.
However, avoid applying LUTs at full strength.
Instead:
- Reduce the LUT intensity.
- Fine-tune exposure afterward.
- Adjust saturation if necessary.
- Match the look across every clip.
Using LUTs as a starting point instead of a final solution often produces better results.
Step 7: Check Video Scopes
Professional editors rely on video scopes instead of judging footage only by eye.
Common scopes include:
- Waveform
- Histogram
- Vectorscope
- RGB Parade
These tools help ensure balanced exposure, accurate color levels, and consistent brightness throughout your project.
Tips for Better Color Grading
Learning Color Grading for Beginners becomes much easier when you follow a structured workflow.
Use these tips:
- Shoot in the highest quality available.
- Record in Log or Flat profiles if supported.
- Correct exposure before grading.
- Keep skin tones natural.
- Use reference images for inspiration.
- Grade every shot consistently.
- Make small adjustments gradually.
- Review your project on multiple screens.
Moreover, taking short breaks during editing helps you notice color problems more accurately.
Common Color Grading Mistakes
Many beginners make mistakes that reduce the quality of their videos.
Avoid these common errors:
- Applying excessive saturation.
- Overusing LUTs.
- Ignoring white balance.
- Crushing shadows completely.
- Blowing out highlights.
- Using different color styles within the same scene.
- Grading without video scopes.
Fortunately, avoiding these mistakes will help your videos look more professional and visually consistent.
Frequently Asked Questions (FAQs)
What is the difference between color correction and color grading?
Color correction restores natural colors and proper exposure, while color grading adds a creative visual style to enhance the mood of the video.
Which software is best for beginners?
DaVinci Resolve is one of the best options because it offers professional color grading tools and a powerful free version.
Should I use LUTs?
Yes. LUTs are useful as a starting point, but they should always be adjusted to match your specific footage.
Do I need an expensive monitor?
No. While professional monitors provide better color accuracy, beginners can learn color grading with a good-quality calibrated display.
How long does it take to learn color grading?
Basic color grading can be learned within a few weeks of regular practice, while mastering advanced techniques requires ongoing experience.
Does color grading improve video quality?
Color grading does not increase video resolution, but it significantly improves the visual appearance, consistency, and cinematic feel of your footage.
Learn more about professional color grading techniques by visiting Blackmagic Design – DaVinci Resolve Training.